Week 2: Forensics
This week we dip our toes into forensics! I’ll start by covering some basic concepts and then we’ll use those concepts to analyze a USB stick.
First things first
Impartiality
When doing forensics, try to be impartial. Don’t assume the guilt or innocence of whatever party you’re investigating. Your primary job as an investigator is to accumulate evidence, not to support one side or the other of a case. Going in with preconceived notions of what happened may cause you to miss evidence that runs contrary to your pet theory.
Locard’s exchange principle
Every interaction leaves evidence.
Dr. Edmond Locard was a French criminologist who lived roughly a century ago. I’m paraphrasing because the original quote was in French and I can’t find an original source.
Locard’s exchange principle is the underlying principle of all modern forensics – the idea that physical evidence is a more reliable witness to events than eyewitness testimony.
I’m slightly skeptical of this principle when it comes to computers, but as we’ll see in the rest of this post, there are plenty of cases where it applies.
Corollary: since the investigator has to interact with things to investigate them, the very act of investigation also leaves evidence. Thus, one of your most important duties as a forensics investigator is to document every single action you take in the course of an investigation, so that clean evidence can be separated out from compromised evidence.
We can also read Locard’s principle as a reformulation of the observer effect in quantum mechanics. Whoaaaaaaaa.
Volatility
So you’re called into an investigation. Where should you start collecting evidence?
It turns out there’s a fscking RFC for this: RFC3227 (published Feb 2002).
The general rule for beginning a forensic investigation is to collect the most volatile data first.
The order of volatility is:
-
registers, cache
-
routing table, arp cache, process table, kernel statistics, memory
Memory is the big one here. A ton of interesting things lie in memory, including the process table, the routing table, and the arp cache.
-
temporary file systems
Temporary files. Internet browsing history.
Not mentioned here, although it deserves a mention, is the hibernation file. The hibernation file is a memory dump that the operating system makes when it hibernates.
it is now safe to turn off your computer
Everything before this point should be collected while the computer is still running, since most of it disappears when you shut off the computer.
If you suspect a computer has been compromised in an attack, pull the network cable, but do not pull the power cable until you’ve collected a memory dump.
That covers the stuff that won’t persist across a reboot. Continuing with less volatile state we have:
disk
Just as important as memory. We'll talk about collecting disk images shortly.
remote logging and monitoring data that is relevant to the system in question
Security camera footage falls under this category.
physical configuration, network topology
I have no idea what this means or why it would be useful, but hey.
archival media
Things like backups. The least volatile data source. Don't worry about it.
Volatility (redux)
Let’s talk about memory dumps. Turns out there is a handy open source tool for analyzing memory dumps which, just to make things confusing, is called volatility.
I’m going to briefly explain the bits that we went over in class. If you want to learn more you are welcome to read the documentation or the cheat sheet.
volatility -f memory_dump.mem imageinfo
First and foremost, if you find yourself in posession of a strange memory dump,
the first thing you’ll want to do is run imageinfo on it to find out what kind of system it’s from. This will spit out something like suggested profiles: WinSP0x86. Copy that string into the rest of these commands.
volatility -f memory_dump.mem --profile=WinSP0x86 psscan
psscan prints a list of proceses that were running at the time of the memory dump.
volatility -f memory_dump.mem --profile=WinSP0x86 dlllist -p 1234
Given a process ID, dlllist will tell you what DLLs a process had loaded.
volalility -f memory_dump.mem --profile=WinSP0x86 mftparser
This is a cool one. It reads the master file table block to give you a list of the files on the filesystem. (What’s the MFT doing in a memory dump? It must be cached in memory somewhere.)
volatility -f memory_dump.mem --profile=WinSP0x86 timeliner --output=dump
This is another cool one. timeliner prints out a timeline of everything that happened on the system (everything still in memory, anyway). Running processes, filesystem events, etc. It’s all here.
Aside: collecting memory dumps
There are several tools for capturing memory dumps. In class, the tool we used was FTK Imager.
Bear in mind that the very act of running a memory dumper affect the memory of the system — the memory dumper will show up in the process list in the dump.
When capturing a memory dump, do not write it to hard disk of the system you’re dumping. Dump to an external hard drive. We’ll be capturing the disk image next.
Hard Disks
That covers memory. Now what about recovering data from disk?
Some important things to know before dumping a disk:
-
Every time you mount a disk, or access files on a disk, you’re changing the disk; Supposedly this can happen even if you mount the disk read-only, although i’m sure it depends on the filesystem driver. Professionals use a device called a write blocker which goes between the disk and your computer and prevents any write commands from being sent to the disk.
-
Never ever install tools on a suspect machine – this compromises the evidence. Have a write-protected cdrom or usb stick in your toolkit with all your forensics tools on it.
-
It’s best to image the disk with the machine off.
How do you image a disk? I’m not sure how you would do it on Windows,
but on Linux you can just dd the disk device to an external file.
dd if=/dev/sdc of=./disk-image.img
Et voila!
Recovering data
Okay!
If you’re even slightly computer-savvy, you probably know that when you delete a file, the file doesn’t disappear right away. The inode in the file system is removed, but the contents of the file linger around on the disk in unused blocks.
The act of looking at unused blocks on a disk and piecing together deleted files from them is known as “carving”. Don’t ask me why.
The tool we used in class was PhotoRec, which is free, open source (GPLv2), and cross-platform.
We’ll see PhotoRec in action in the next section.
The Challenge
We were given a challenge in class to investigate a dump of a USB drive. The “story” was that the USB drive was recovered from a North Korean defector.
Following best practices, I tried to document what I did, keeping track of my actions and observations, and noting down timestamps as I went.
The following events took place mostly on Mon Jan 22nd.
17:00 First, I tried analyzing the USB image data with volatility imageinfo. Volatility didn’t recognize anything - makes sense, since we are told this is a disk dump rather than a memory dump.
If i were doing this on linux, the first thing I would have done is run file
on the disk image to see if it was recognized as any known file type, but i’m
not so i just have to guess.
17:09 Next step, mount the image with OSFMount and poke around.
On linux, you would use losetup to mount the images as a loopback device.
Again, make sure to mount the image read-only. We don’t want to allow any modifications to happen to the image and compromise the evidence, and we don’t want to accidentally overwrite blocks of data from delete files that we might be able to recover.
There are 6 files, mostly with Korean-looking names an .mp3, a jpg, a png, a bin, a bat, and a zip.
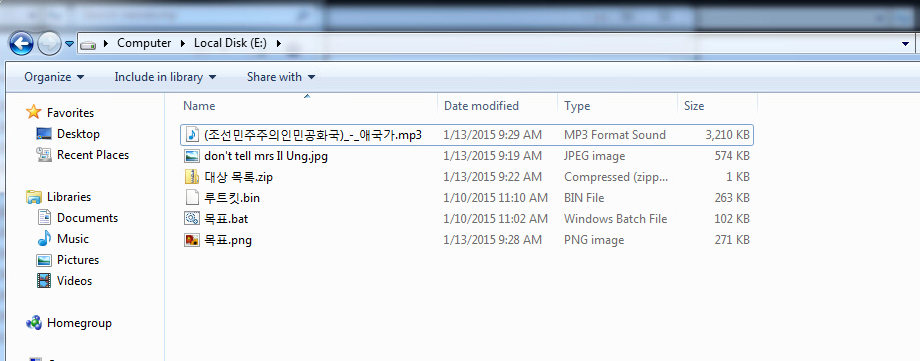
We’re going to ignore these for now and try to recover deleted files with PhotoRec.
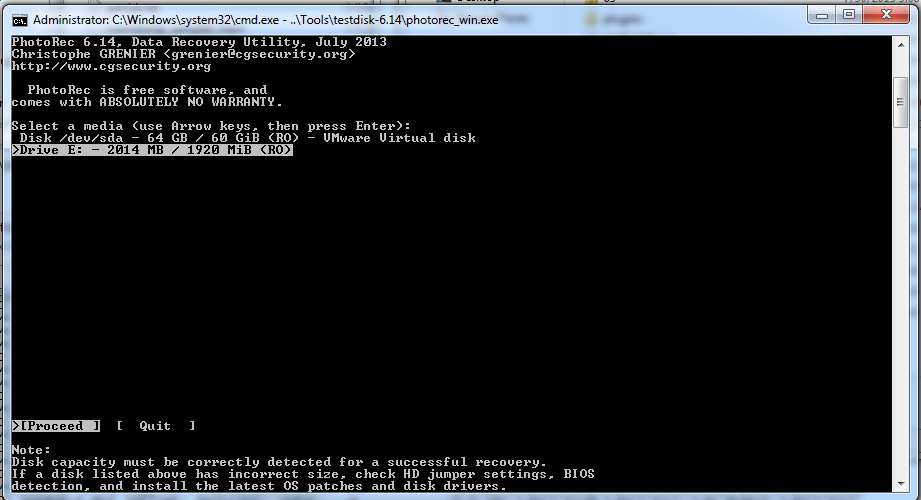

Select the drive you want to carve, select the output directory. Pretty simple.
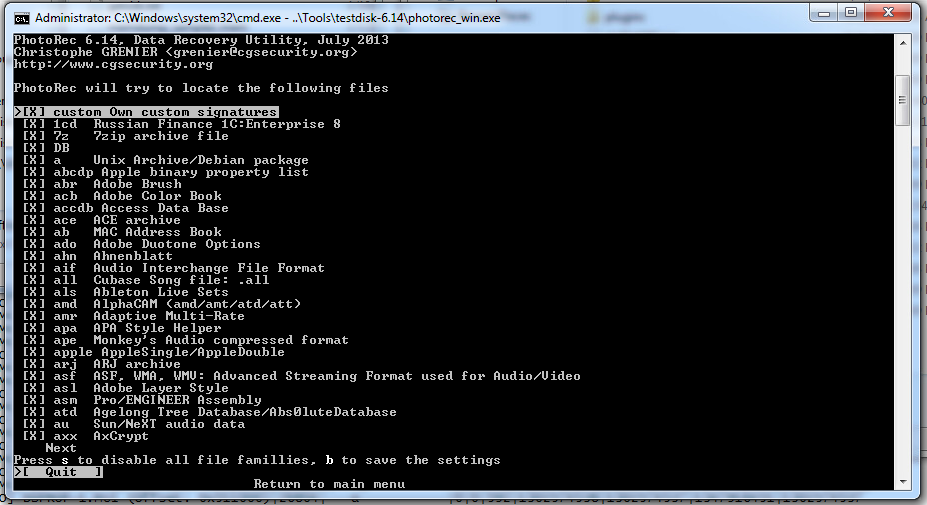
You can also limit which types of files PhotoRec should look for, but I don’t really know what I’m looking for so I just leave it at the default of everything.
17:15 Photorec was successful! It recovered 8 files. Let’s see if any of these are useful.
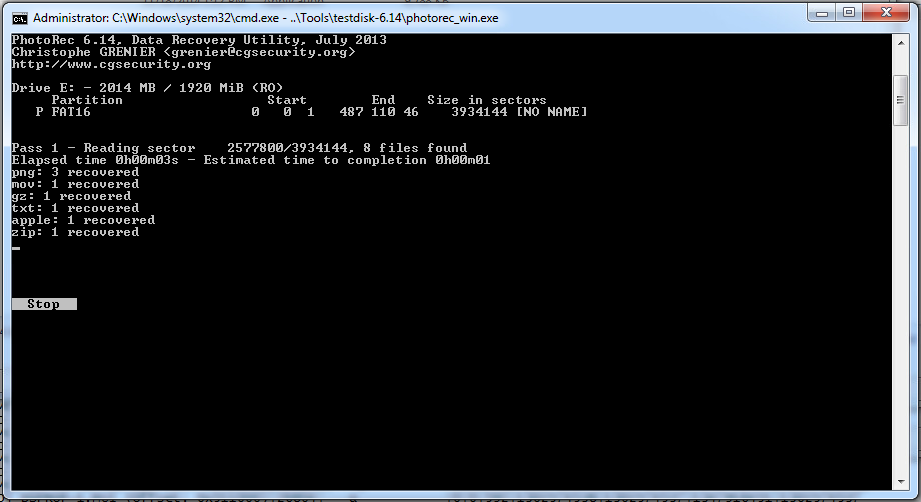
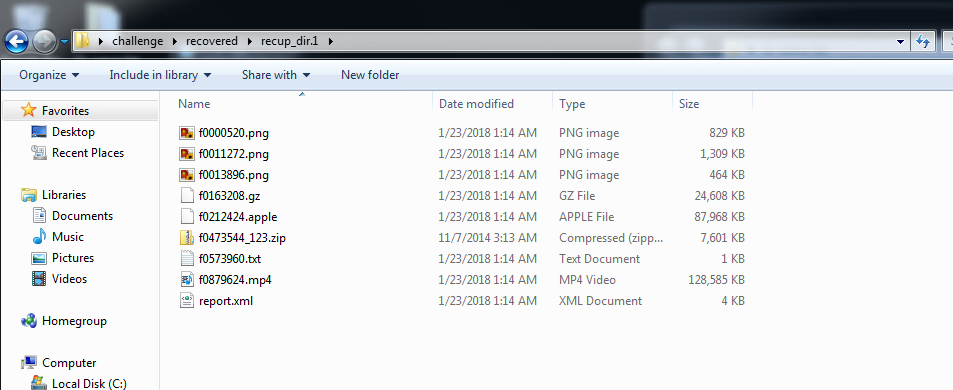
The filenames are kind of garbage because they were deleted, so all their metadata, including the filename, is gone. The filename PhotoRec gives them is based on the sector it found them in, I believe.
Are any of these image files we found helpful?

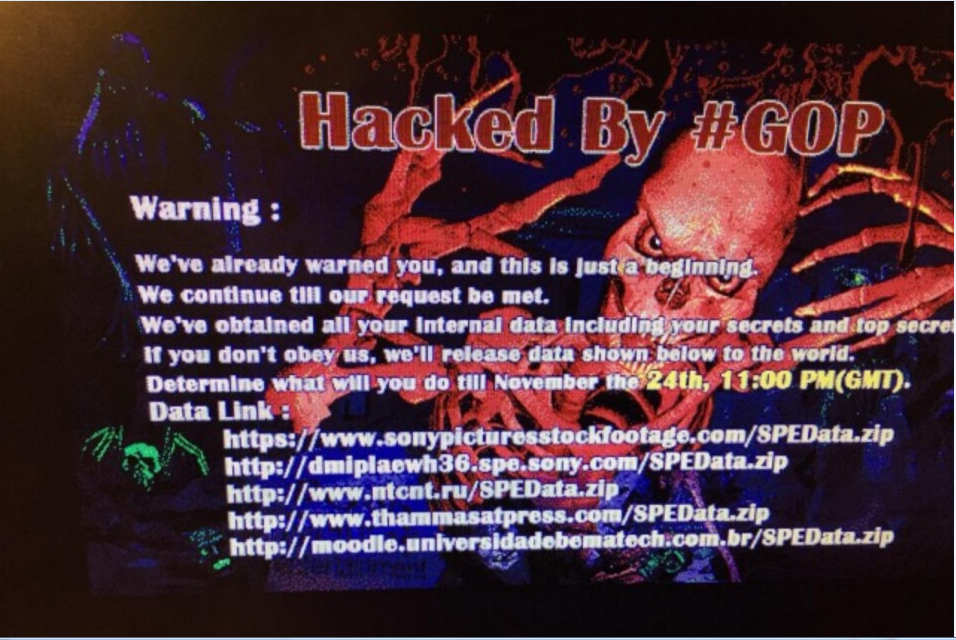

…Not really. The middle one is intriguing, but I don’t know what it means right now.
This isn’t leading anywhere. Let’s go back and take a look at the files that hadn’t been deleted.
17:?? Tried to open the zip file. It contains a csv, but it’s password protected. Rats.
There was also a zip in the deleted files we recovered, let’s look in there.
Oh, this is interesting! One of the files in the deleted zip is a rar of some software named DuBrute.
Googling for DuBrute turns up this article:
“DuBrute is a service that processes three text files in sequence: IP addresses, login names, and then passwords. Once running, it fires off logins and passwords until it exhausts the first IP address and repeats the process on down list one until the end. Cute and nasty.”
– https://www.techrepublic.com/blog/it-security/around-the-world-in-ip-attacks/
There was also a host.txt file in the same zip containing a bunch of ip addresses.
Someone was probably trying to brute-force a bunch of hosts.
17:26 Opened “fdd” in fileInsight. It’s an elf executable.
I found a bunch of URLs in it with strings, mostly at the domain ttluiliang.com - possibly worth investigating?
17:31 On the hunch that the .apple file is some sort of apple-format disk image, I mounted it and ran photorec on it. No dice. In fact, photorec seems to recover the whole file again … which sort of makes sense. I guess recursively running photorec on recovered files isn’t very useful.
17:35 Watched the recovered .mp4 video. It shows someone investigating a piece of malware in “RAPTOR” - some sort of network/threat monitoring software? A quick google doesn’t reveal any products under that name.
At this point, I consulted the hints. They suggested I take a closer look at one of the jpeg images on the drive to find the password for the zip.
I ran that file through strings and one line stood out:
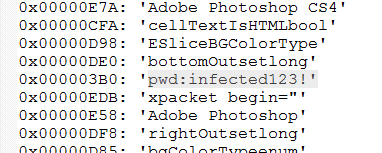
Bingo! I have no idea what this password string is doing in a jpeg. It’s probably in the EXIF data?
The password works and we’re able to open the zip file and read the csv.
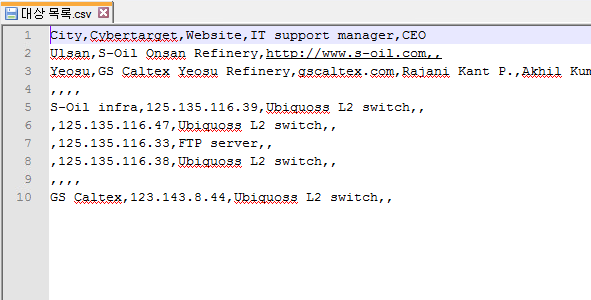
What does it mean? Who knows.
Conclusion
As best I can tell, someone probably used this USB to launch an attack on the IP
addresses listed in host.txt using the DuBrute malware. They went to some effort
to cover their tracks by deleting the incriminating files.
The fact that one of the files was encrypted, and the password was also on the disk,
hidden steganographically in another file, suggests that they were received from
another party.
It was really fun to get to try out these skills in a practical scenario.
Keeping track of what I was doing as I was doing it was surprisingly difficult! I had a tendency to want to jump around from lead to lead, not really focusing on one thing at a time, and when I thought I was on a hot trail it was easy to forget to take notes until later.
I’m pleasantly surprised that there are solid open source tools for memory analysis and file recovery. I’m used to everything in the security space being some proprietary product.
Acknowledgements
This post was based on lectures given by Christiaan Beek, Lead Scientist & Principal Engineer at McAfee.